These Are My Friends, My Pals, My Blogging Buddies!!

Showing posts with label recipe. Show all posts

Tuesday, September 20, 2011

Homemade Tootsie Rolls

This is one of many recipes, candy and everything imaginable, that I have tucked away but have never actually made, sooooo ... I am hoping it will be good, sure sounds like it, but I won't make promises I can't keep!  I absolutely love the little vanilla tootsie rolls but am told they are only sold during certain seasons.  I assume Halloween is THE one, with those little bags of assorted candy that contain all flavors of tootsie rolls. I ALWAYS pick out all the vanilla before putting the treats out for the little ones.  Every now and then I see one in the large bowl that I have missed and dive for it lest any little ghost or witch should beat me to it!!
Anyway, here is the recipe and I surely hope it turns out as good as it sounds .., I do plan on making it, leaving out the cocoa to see if it is half as good as the little vanilla tootsie rolls that I so love.  If it is, it for sure will be a keeper!!!

Homemade Tootsie Rolls

2Tblsp sof butter
1/2 cup cocoa
3 cups powdered sugar
1 tsp vanilla
3/4 cup instant milk powder
1/2 cup white corn syrup

Mix everything together really well and knead on board sprinkled with powdered sugar.  Knead until smooth and pliable.  Divide and roll into ropes of desired length, cut with very sharp knife and, hopefully you will have your tootsie roll clones.  If you try this let me know how it turns out.

Be sweet!

Tuesday, May 17, 2011

Banana Nut Bread Jam recipe, Easy Peasy

Banana Nut Bread Jam

10 ripe bananas, pureed (about 3 cups)
1 Tbsp lemon juice
4 cups sugar
1/2 cup brown sugar
1 1/2 cups chopped walnuts, toasted
1 package powdered pectin
1 tsp. cinnamon
1/2 tsp nutmeg

Mix bananas, walnuts, lemon juice and pectin in a large pot. Stir while bringing to a full boil.  Add sugars all at once, stirring constantly, bring back to a boil.  Let boil for 1 minute.
Ladle jam into jars, leaving 1/4 inch headspace.  Process in a boiling water bath for 10 minutes.
Recipe makes about 6 half pints, so easy, no pressure canner needed.

If you only wanted to make a jar or two without the water bath, it will be fine to just refrigerate and
enjoy!  This is REALLY, REALLY good and SO easy.
Pecans can be used instead of walnuts or no nuts at all if you choose.
I hope you will give this a try, even if you do not normally preserve any kind of food, this is such a good
and simple jam recipe that tastes absolutely scrumptious and will have your family look at you in disbelief that you turned out such a fabulous treat!  No special tools, nothing that is not found in any ordinary kitchen.
I hope this will be a keeper for you to enjoy again and again.
Be sweet, as always and treat others as you would like to be treated!  XXOOOXXO


Sunday, March 27, 2011

Sour Cream Country Biscuits

This recipe for that good ole' country favorite, breakfast biscuits hot from the oven, is a little different as it contains no shortening or butter, but sour cream.
It gives the biscuits a little tang and the rich moistness will have everyone coming back for more!
I believe this will be a keeper in your recipe box! It is good enough to serve on special occasions or for everyday fare!

Sour Cream Country Biscuits

3 cups all-purpose flour
1 tablespoon baking powder
1/2 teaspoon salt
3 tablespoons sugar
1/3 cup cold sour cream
1 1/3 cup heavy cream

Preheat the oven to 425 degrees.  In a large bowl, combine the flour, sugar, baking powder, and salt. Using a pastry blender cut in the sour cream until the mixture
forms coarse pieces.
Add the sour cream and stir the mixture with a fork until most of the dry
ingredients have been moistened.
Turn the ingredients onto the counter
and knead and fold until the dough is formed.
Do not knead longer than
necessary.  Roll or pat the dough to about 3/4-inch thickness and cut with a biscuit
cutter.
Place the biscuits on a greased baking sheet with the edges
touching.
Bake for about 14 minutes or until the tops are just golden brown. 

Sooo good with a little butter and strawberry jam!!
Also perfect for biscuits and gravy.
Be sweet, all!!!

Wednesday, November 17, 2010

Make Your Own Stove Top Stuffing

With the holidays upon us in full force now ... I do mean FULL FORCE, as I tried shopping for last minute Thanksgiving items, I was shoved, pushed, almost trampled and swore never to get out of the house again till after New Year's Day!  Ha!  I expect that to last maybe through the day, possibly into tomorrow.  I forgot to get sage!!  I blame all the confusion at the grocery store on my sudden loss of memory.
In fact, I am sure that was it.  I always have sage in my pantry, but now that it is time to begin preparation for what I hope will be a feast for my family to remember forever, there is no sage in the house!
I lay awake for quite some time last night trying to imagine how a stuffing would taste with no sage.  I simply could not come up with anything good, so I suppose I will brave those pushing, shoving crowds again to make yet another trip to the grocery store for a single bottle of sage!
I am hoping as I stand in line without a shopping cart, holding my lone bottle of sage, someone will be gracious enough to let me go first!
You would not believe how big burly husbands with overflowing grocery carts stand their ground, turning around to stare at you with a single item and not feel an ounce of remorse that they do not offer to let you go ahead of them!
I can only think they possibly are getting even with their wives for sending them out for chocolate chips and a hundred other things the lady of the house had realized she did not have!
I have a great recipe for make ahead stuffing that so resembles Stove Top, it can be used in the same way and also substituted in any recipe calling for Stove Top Stuffing.  It is really good.
 As soon as I get enough nerve to go to the grocery store again, I plan to make it.

Stove Top Stuffing Clone

30 slices firm bread (I use a loaf of sandwich bread)
3 Tblsp. minced onion or onion flakes
2 tsp. garlic salt  (or powder)
1/2 tsp. seasoned pepper
3 Tblsp. dried parsley flakes
3/4 tsp. ground sage
1/3 cup cooking oil (or olive oil)
Preheat oven to 300 degrees.  Cut bread slices in 1/2" cubes and place
in two 9"x13" baking pans.  Toast bread cubes for about 45 minutes. (Mine doesn't take this long, so be
sure to check them often).  Stir once in a while.  Remove from oven when toasted and cool slightly.  Mix remaining ingredients together in a large bowl.
Lightly toss bread cubes with seasonings to coat. (I found I had to add more oil for the seasonings to stick well.  You can play around with it and find what works best for you.)
Place in a large airtight container and store in refrigerator for up to two months or you can freeze it for up to six months.
This recipe makes about twelve cups.

It is great to have on hand during the holidays.  I make cornbread dressing and adding a couple of cups
of this along with the cornbread makes for a yummy dressing!!
Be sweet and may you always walk with angels.

Thursday, November 11, 2010

Homemade Hot Chocolate Mix

Hot Chocolate Topped With a Dollop of Whipped Cream and a Sifting of Cinnamon


Oh, I can hardly wait for the weekend!!!  Guess I am about half nuts (or all maybe) but it is supposed to be a rainy, chilly weekend after the unusually warm week we have enjoyed so far!  I believe it is still called Indian Summer.  However, I am actually looking forward to the coming cold front.  There is nothing so comforting as wrapping in a soft blanket with a good hot cup of hot chocolate on a dreary chilly night,  watching favorite TV programs that have long since left prime time!  I am sharing a very good homemade hot chocolate mix with you and I believe it will be a keeper.  It is a little different than the ordinary ones.  This makes a lovely gift when packaged as a gift in a jar, serving instructions handwritten on a whimsical little tag cut from a plain brown paper bag and tied with jute, twine or a country ribbon.  Place this in a basket lined with paper shreds, mugs, marshmallows and a shaker of cinnamon and VOILA ... a gift suitable for Queen Elizabeth herself!!  I am sure she would curl up with a blanky and cup of steaming hot chocolate if given the opportunity!!!  
Here is your recipe.  I hope you enjoy making this and keeping it on hand for the coming months.

Hot Chocolate Mix

1 (5 or 6 Qt.) box instant milk
1/2 cup powdered sugar
1 cup Nestle's Quik
1/2 cup powdered creamer
1 box instant chocolate
1/4 to 1/2 cup cocoa

Mix ingredients well and package in        airtight container.Use 1/3 cup mix to 1 cup hot water.
Be sweet, may you always walk with angels and keep plenty of marshmallows and whipping cream!!!!
(I have no idea what I did, but I can't make the post smaller, the font won't change.  I am just struggling trying to figure out everything as I go!!!  One thing for sure - you don't need glasses to read this post!!!!)

Tuesday, August 3, 2010

Homemade Gift Idea - Gift In A Jar


Peach Crumb Cake Mix

3/4 cup granulated sugar
3/4 cup quick oats
3/4 cup brown sugar
2 cups all-purpose flour
2 teaspoons baking powder
1/2 teaspoon salt

Layer the ingredients in the order given into a wide mouth 1-quart canning jar.
Pack each layer into place before adding the next ingredient.

Attach a gift tag with the following instructions:

Peach Crumb Cake:
Contents of Peach Crumb Cake Mix jar
3/4 cup butter or margarine
1 (29 ounce) can peach pie filling

Heat oven to 350 degrees F.
Empty contents of jar into a mixing bowl, stirring to combine.
Melt butter and stir into dry ingredients to form a crumbly mixture.
Press half of the crumbs into a greased 9 x 13-inch pan and top with
Peach pie filling. Sprinkle remaining crumb mixture over filling.
Bake for 30 to 35 minutes.

An even more thoughtful gift would be to add a can of peach pie filling and a 9 x 13 inch
baking pan.  This would be gorgeous packed in a pretty basket tied with a colorful
ribbon.  It is never too early to begin collecting ideas for homemade Christmas gifts. Last year I
had planned to share lots of goodies I had saved over the years, but the "best laid plans of mice and men
go awry" so this year I will try to make up for it and have many great homemade gift ideas in mind.
Handmade and homemade are always so much nicer than any store bought gift for a little piece of you goes into each present.  I feel special when someone cares enough to take the time to make something just for me.  It gives a warm fuzzy glow and immediately the thoughtfulness of a homemade gift becomes one which you know has come straight from the heart!!
Be sweet!

Saturday, June 19, 2010

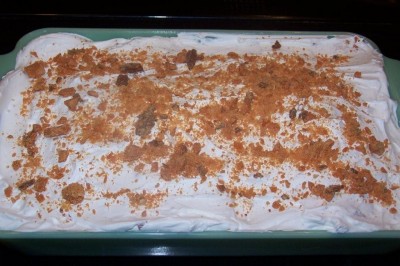
Like Butterfinger? Like Twinkies? You'll Love This!!

Butterfinger and Twinkies have long been favorites of mine.  I absolutely LOVE them.  Even though I am keenly aware too much sweets are definitely not good for either your health or your figure ( as if I even had a figure any more) I simply can't resist a good old crunchy Butterfinger or a gooey Twinkie once in a while.  Pair the two along with chocolate and whipped topping and you have a dessert that is guaranteed to melt in your mouth and tickle your innards!!
This yummy recipe will have little kids and big kids alike coming back for more!

Butterfinger Twinkle

1 small pkg. chocolate instant pudding mix
1 15 oz. pkg. Twinkies
6 Butterfinger bars, finely chopped
1 8 oz. Cool Whip

Prepare pudding mix. Set aside and tear each Twinkie into 3 or 4 pieces.  Place pieces in 13 x 9 inch pan. Spread pudding over Twinkie pieces and top with half of chopped Butterfingers.  Cover with whipped topping and sprinkle remaining chopped Butterfingers over top.  Chill 3 or 4 hours before serving. Makes about 16 servings.
As it chills, sit back, relax and be sweet!!

Saturday, March 6, 2010

Strawberries In A Cloud

It will soon be strawberry season and if you are anything like me and love the taste and appeal of a good ole' strawberry dessert any time of the year, then this one's for you!!!  Easy peasy with a melt in your mouth goodness and you will have guests or family members coming back for more!!
When fresh strawberries are available, you may use those instead of the pie filling and tuck a few in the Cool Whip and it is absolutely heavenly. Just pour a little sugar over the berries first to bring out their natural sweetness.  I can almost taste it now.  Think I will check for ingredients and if any are lacking, I'll make a quick trip to the grocery store and make this baby tonight!  Boy, it's so easy to fool everyone into thinking you are an awesome cook when all you have to do is follow a few instructions.  Give me a recipe and I can make anything!!
Here it is.  I hope you will give it a try.  I promise, you will not be sorry!!  Personally, I remove the calories from mine before refrigerating!!LOL

Strawberry Cloud

2 boxes Twinkies
1 large box strawberry gelatin
1 large box instant vanilla pudding
1 can strawberry pie filling
1 container Cool Whip
Pecans

Line a 13 x 9-inch pan with Twinkies. Mix gelatin according to package directions and pour over Twinkies.

Prepare pudding as directed and pour over gelatin. Cover with pie filling and then top with Cool Whip. Sprinkle with pecans. Chill at least 2 hours before serving. Serves 8 to 10.

Be sweet, Dearies ... with one bite of this dessert you don't have an option!!

Monday, April 6, 2009

Easy Bread Recipe (or rolls and cinnamon rolls)

No Knead Batter Bread                                           

6 1/2 C flour

2 pkg. instant yeast (or 4 1/2 tsp)

3 T sugar

3/4 tsp salt

3 C warm water

2 T melted butter

Put 3 1/2 cups flour, yeast, sugar and salt into large bowl.  Mix all together and add warm water and melted butter to dry mixture.  Blend together till moistened and beat well to incorporate air into batter.  Gradually add remaining flour a little at a time until you have a stiff batter.  It may not take the full amount depending on weather, etc.   Cover and let rise in warm place until double.  This takes about half an hour.  Stir the batter down and spread in greased loaf pans.  Be sure to grease around the rim of loaf pans as well.  Cover and allow to rise till batter reaches the top of the pans. Also about half an hour.  Bake at 350 degrees until golden brown.  I hesitate to give a baking time as ovens vary so much.  Just watch it the first time, then you will know.  Mine takes about 20 minutes.   Brush tops with butter as soon as you remove loaves from oven, then carefully remove from the pans.  If you do not have a wire rack to cool them on, put them on 2 or 3 layers of paper towels.   You need a good bread knife to slice with and it is better to wait till completely cool before slicing. 

If you would rather make rolls, just add enough flour to make not just a stiff batter, but one you can form and shape.  They are pretty when you put 3 little balls in each well of a muffin tin.  They are good just made into rolls and plopped in a cake pan till it is full!!  I had rather make rolls than loaves, don't know why....just a preference.

You can also make cinnamon rolls with half of the dough you made for rolls.   Just foll out dough into a rectangle, brush with melted butter and sprinkle generously with sugar and cinnamon.  Roll into a log, like for a jelly roll and cut equal slices of the log, place cut side down on baking sheet.  Bake at 350 degrees till brown.  Glaze with a powdered sugar glaze or mix a little white corn syrup with canned frosting, whatever your little ole' heart desires!

Oh, I almost forgot.   If you are using self rising flour, be sure you omit the salt!!!   You do not have to use plain flour, even though most yeast recipes say plain.  You can use self rising, but just do not add salt.  I almost always use self rising for everything.  It is just easier not to add the salt and baking powder.  Besides the baking powder in self rising will only help your bread or whatever to rise.

Be sweet!

Wednesday, January 21, 2009

My Chat With Charlie


You just have to read Charlie Berry's blog!  It is too good to miss.  He has written a post for me explaining his love for recipes.  I tell you, I laughed and laughed.  Especially when he was learning to cook and got carried away with the spices until everything tasted like alum.  He is exactly like me, with a truckload of cookbooks and probably every spice and herb known to man.  I know you will love his humor and style as much as I do.  Pay a visit to Berry Blog and you will stay for the entertainment and visit often.  I was reminded of the mismatched set of dishes my dad proudly gave Mom for Christmas one year.  I will surely have to tell you all about that little episode soon. Like always, be sweet and good and smile.